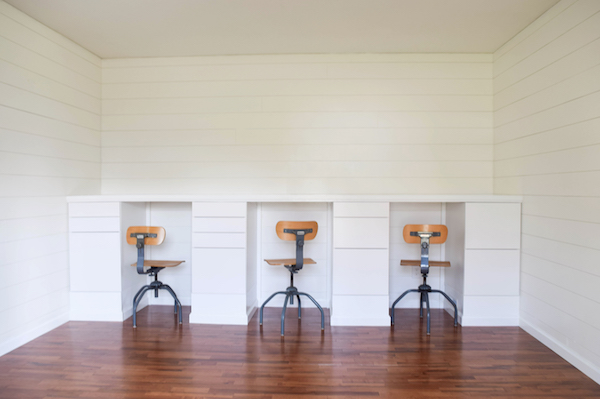
We do a lot in our home office. And with young children it will also be a prime place for kid activities to happen. So we wanted our office, converted from a former formal living room, to be ultra big on functionality. Think lots of work zones for an array of different purposes – reading nook, crafting, sewing, gift wrapping, computer work, and eventually even a conference-type table. (Which makes it sound too formal. Just a big work table for children to do things or for us to work and spread out without cluttering the dining table or kitchen island.)
The first order for our home office was to build a custom, built in desk that would run wall to wall along one length of the room. My budget goal was around $1,000, and we ended up around $1,200 which is still a number I feel okay with. (And at some points after getting some quotes for counters that made me freak out, I am pretty proud of that number!)
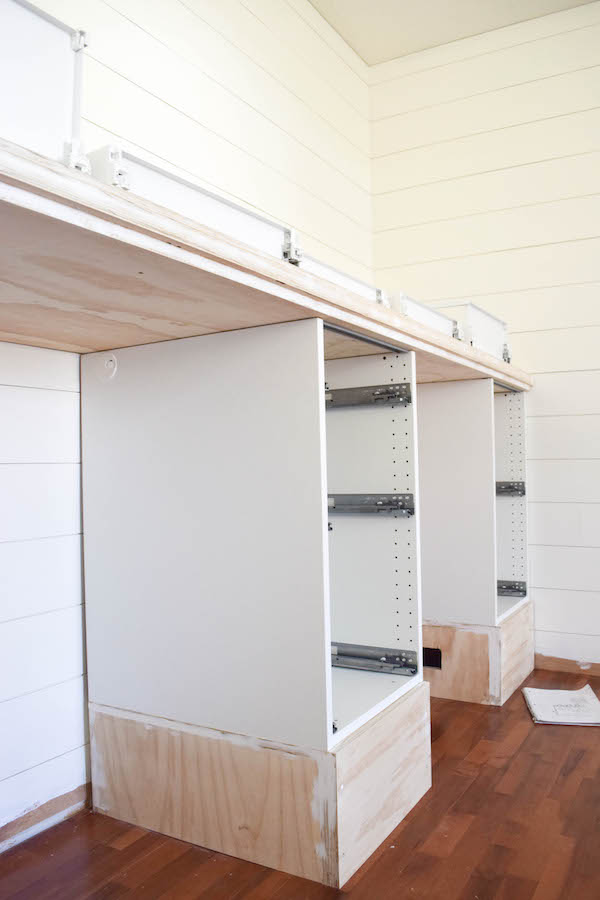
The cabinets are from the veddinge line at ikea and purchasing these four units was about $860, by far the biggest single expense of the project. I chose cabinets with lots of drawers, but doing fewer drawers is a big way to save. We also opted for the drawers that close softly on their own, which made our final price $100 more than it could of been. If I really wanted to stay under budget I could have skipped those, but for something that we will use often I thought the much nicer “drawer experience” was worth it. I know this isn’t what a “budget” is supposed to be like. Normally I’m not like this.
The cabinets were only 30 inches tall and we wanted our final standing desk to be 41 inches. You can find your ideal standing desk height by measuring the distance of your elbow to the ground. David and I are quite different in height, so he nicely let us veer toward my ideal size instead of his. Also it is easier to work at a desk that is a little too low than one a little too high.
David accounted for a 2 inch thick counter, which meant for our standing desk, we needed to build a base for the cabinets that was 9 inches tall. We made these out of a nice pine from Home Depot. This wood was about $15 for each 4×8 foot sheet and the second biggest expense on the project.
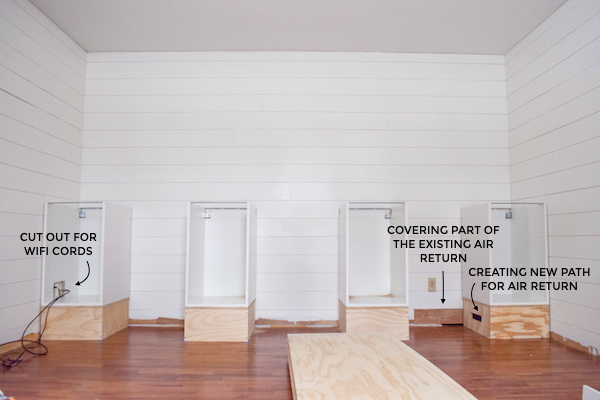
The cabinet bases got screwed into the floor and wall (moi secure). Then the cabinets themselves were screwed into the wall and cabinet bases. We made some modifications to allow for an air return vent we are partially covering, and cords for the wifi to be nicely hidden in the cabinet. (YES.) And notice the dated, off-white 70’s outlets that are gone now!
Other cords (for computer, printer, and shredder) can be tunneled along the bottom of the counter and through some holes we made with a two inch hole saw drill bit. We bought these white cord covers on amazon that fit perfectly. This was for the purpose of conspicuously channeling all cords to either the single outlet on this wall or a surge protector hidden in the desk.
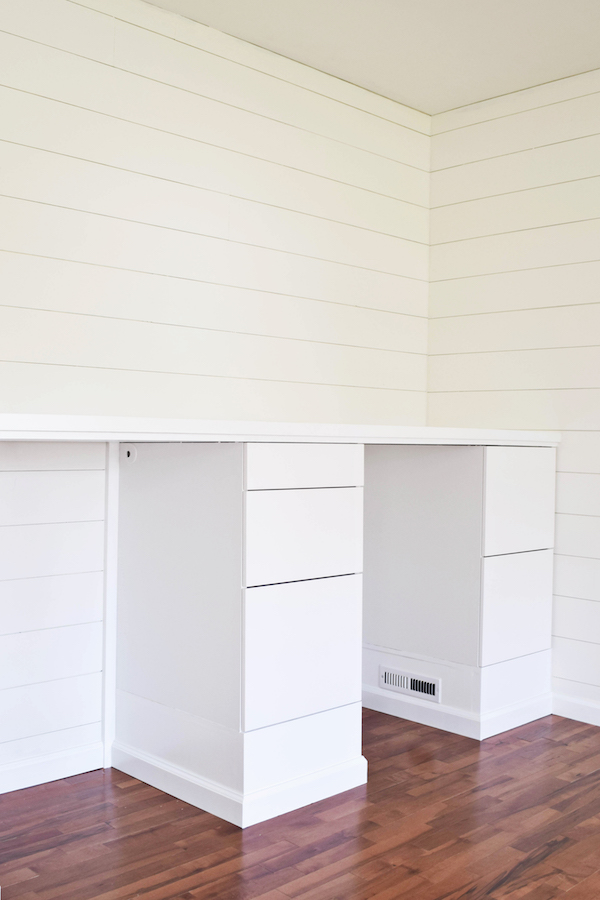
Then we added baseboards around the cabinet bases (and the whole room!). When doing our shiplap, I knew we’d need more baseboards when we built this desk, so I always ignored the existing ones in the original room since I planned to replace all of them. Now the baseboards are a white color that matches the walls instead of the old dirty yellow-white. I went ahead and painted the baseboards before putting them on since it is so fast and easy to paint them when they are not attached.
To cover some gaps where the back of the cabinets touch the wall we added a little square quarter round detail. That with the baseboards made everything look so polished. I feel like when DIY-ing something like this, generally the more details of moulding the better for making it look well done. If at one end of the spectrum is just setting a board across two file cabinets to make a desk that will look completely makeshift, than the more millwork the better for making it look well, not that.
For some final caulking, we used backer rod. This is a nifty product that is pretty much just a foam tube you shove in to a gap too large to caulk to fill it out and make it caulk-able. With a combination of this and spackle, we had a nice smooth layer all the way up the wall and for all the many little crevices and seams around the desk.
I painted the cabinets bases in high gloss Ralph Lauren “Chalk White” which is the wall color and quite a good match for the veddinge series.
The surprise small thing that I have learned makes me feel really different about our rooms is updating those outlets. Nice fresh white ones compared to the almond-y off white ones make a bigger difference than I first realized. Sometimes in other rooms I would paint old plates white, but swapping out the plates and the outlet faces themselves is only about $3 total. And I can buy those nice tamper resistant ones for the kids too. Now I plan to just buy new and fully update these in each room as we tackle it.
How we DIY-ed the counters (for like, $75!) is its own post here. And your girl needs to find some drawer pulls. I am wavering so hard because it feels like a big decision for the direction of the feel in the room. PLUS shopping around for some extra tall stools to replace these temporaries. Because even standing desk-ers need breaks.