When you have a lot of tools, or kids, or cars, or anything really, your usable garage space quickly disappears. For us, winter is especially a time where everything needs to retreat into the garage and suddenly there’s no space for anything. The things of summer – bikes, grills, lawnmowers, yard tools, and the like all get crammed to the sides of the garage so we can fit cars in. This year I (David) say ENOUGH, we need a shed.
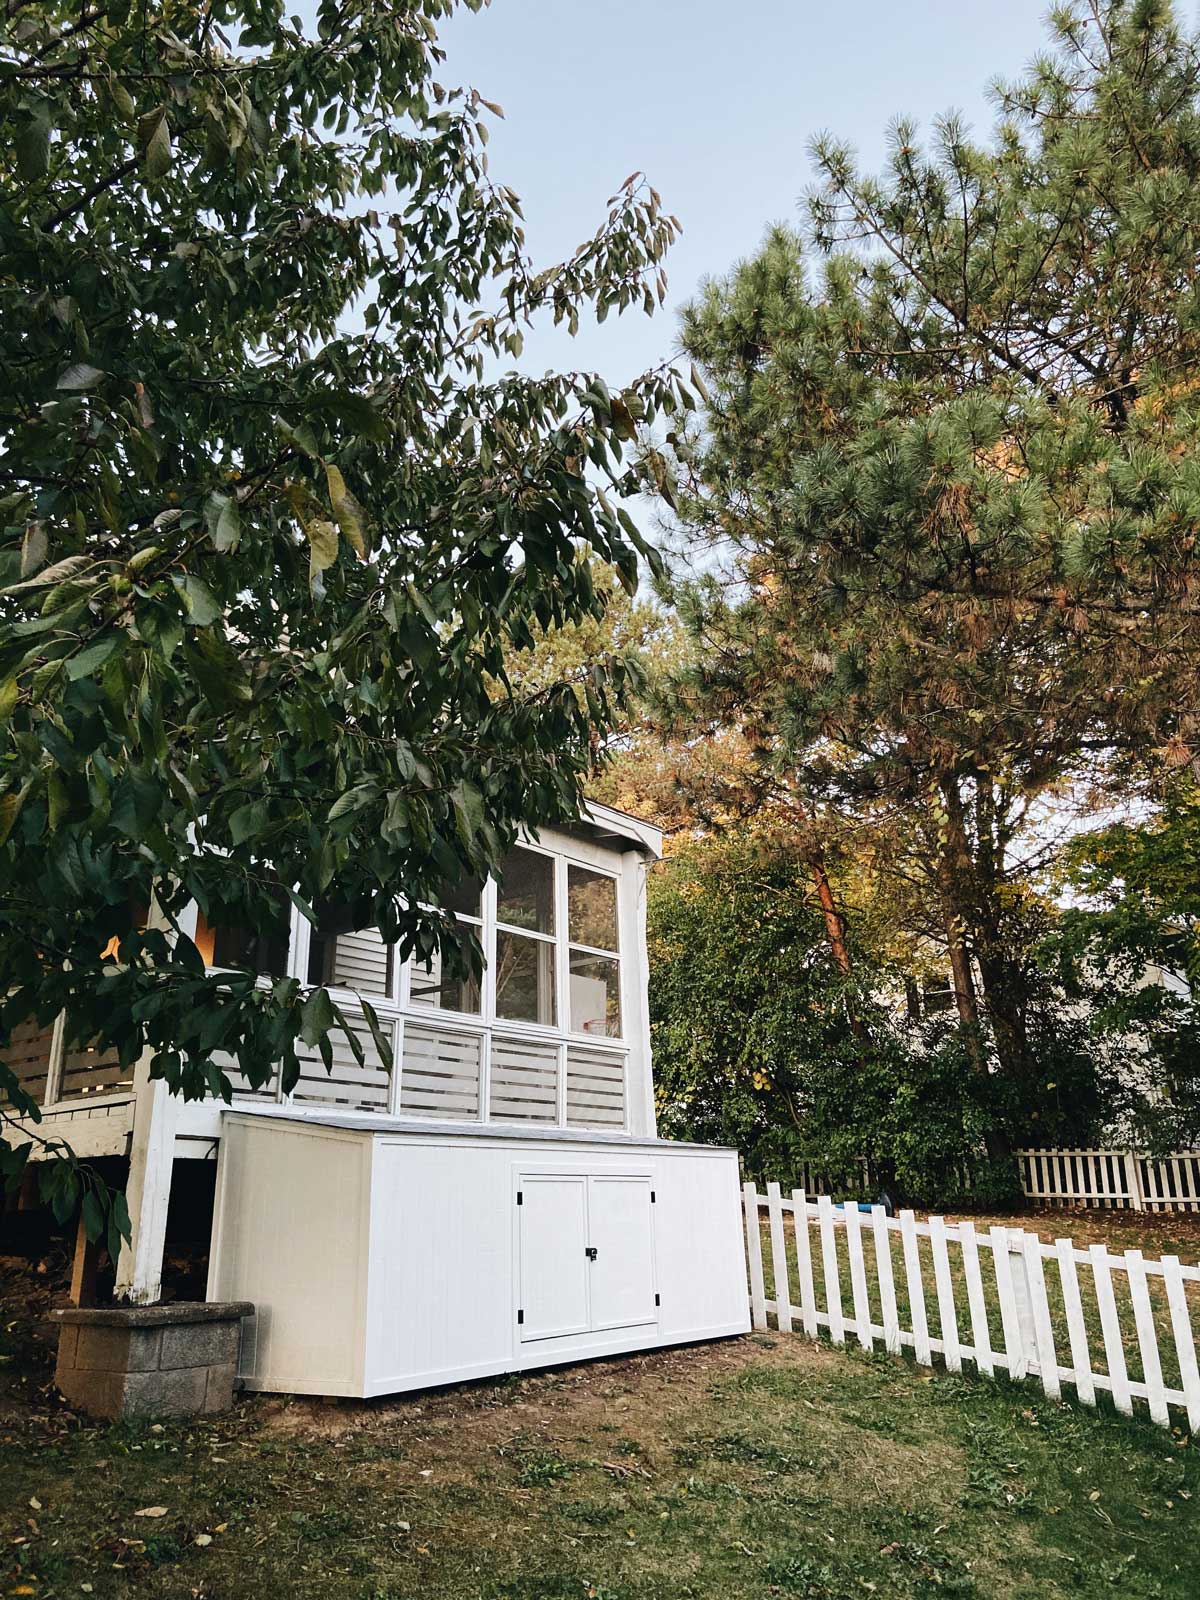
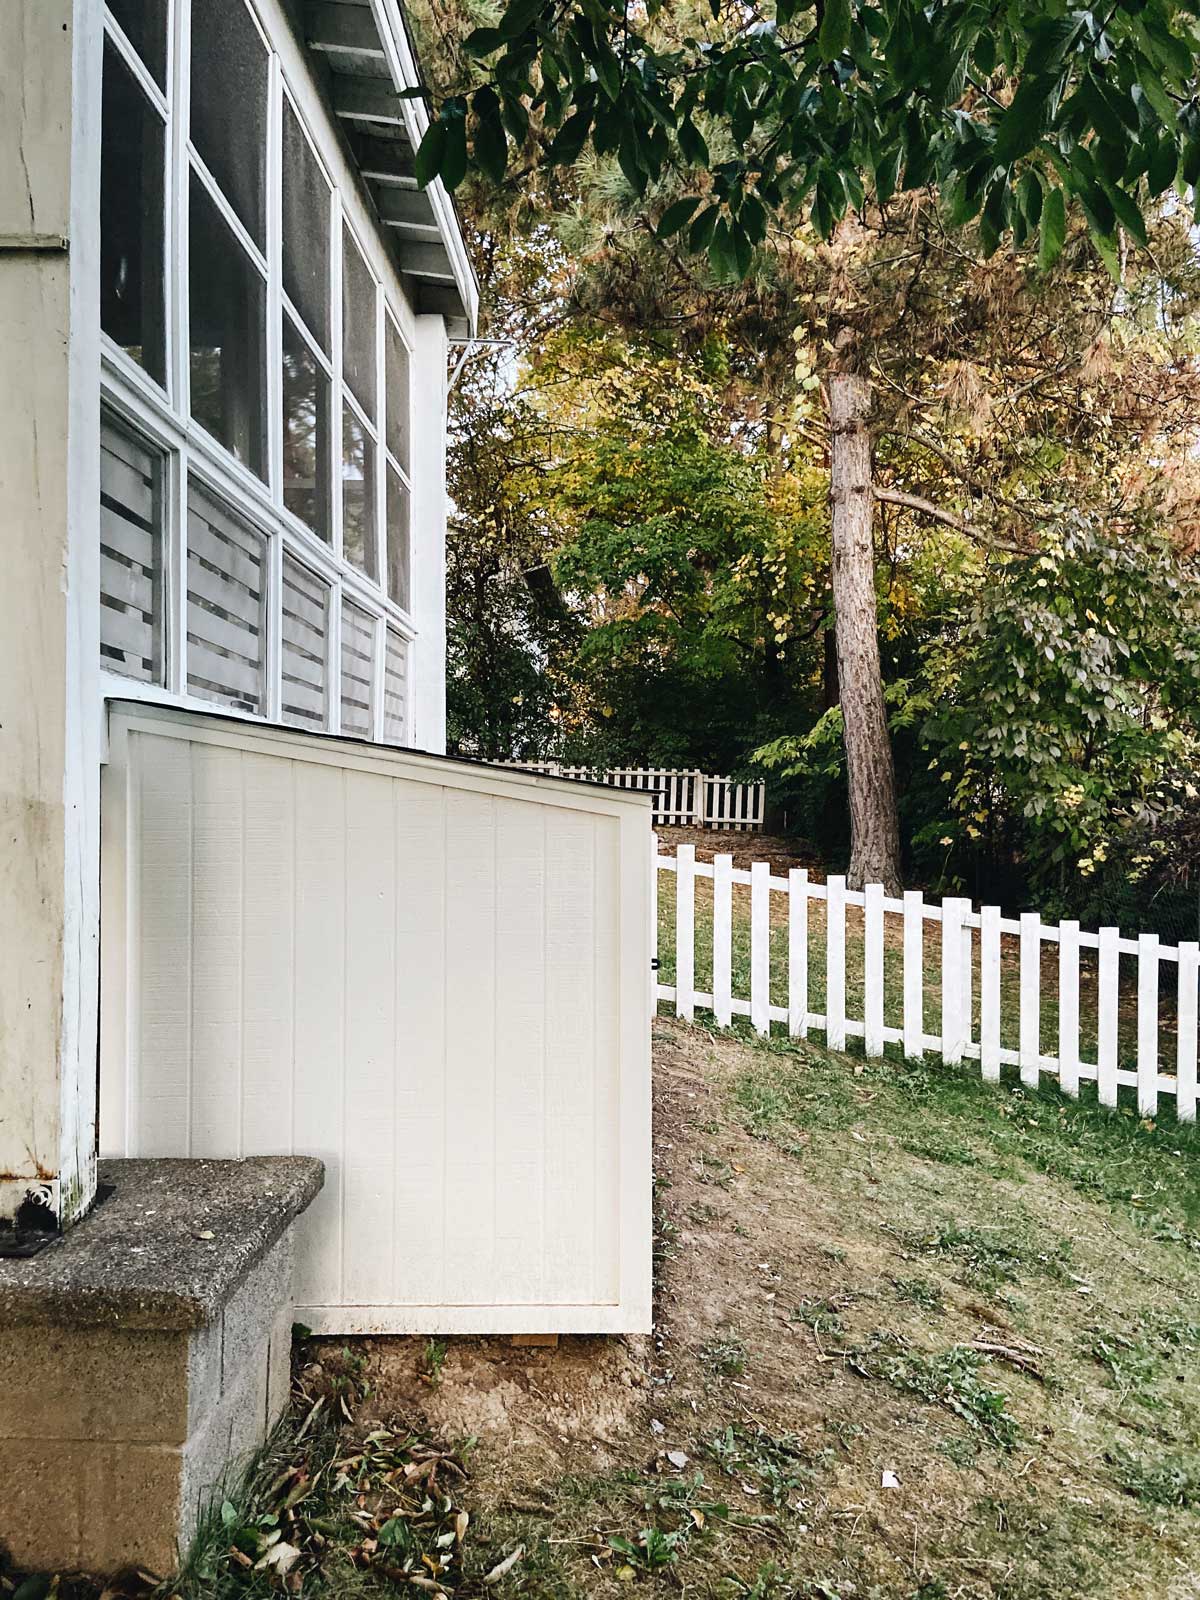
But where to build this shed? We didn’t want backyard space being diminished and front yard is not a choice, so the option that remained was the space to the side of the house near the sunroom. This turned out to be a great spot for a shed because there was an existing structure to build on and a flat-ish area for the shed to sit. With some (very) minor excavation, the space was ready to go and I got to work.
We decided on a classic shed design with T 1-11 siding, double doors, and strips of trim framing everything in visually. The dimensions are about 4’ x 10’ which will give substantial storage without dominating our yard. For a continuous look with the sunroom, we used light shingles and white paint.
MATERIALS
- (2) pressure treated 4” x 4” x 12’ timber ($30)
- (5) pressure treated 2” x 4” x 12’ lumber ($40)
- (2) pressure treated 3/4” x 4’ x 8’ plywood ($64)
- (3) 2” x 4” x 12’ studs ($15)
- (13) 2” x 4” x 8’ studs ($35)
- (2) 1/2” x 4’ x 8’ OSB plywood ($18)
- (4) 11/32” x 4’ x 8’ T 1-11 siding ($108)
- (1) 1/2” x 4’ x 8’ sanded plywood ($35)
- 3” deck screws ($25)
- 1 5/8” exterior screws ($9)
- 7/8” roofing nails ($3)
- 1 1/4” galvanized brad nails ($10)
- 15 pound roofing felt ($15)
- 20’ drip edge ($20)
- (2) bundles of 3-tab shingles ($70)
- caulk ($5)
- (1) gallon of exterior paint ($30)
- (4) hinges ($10)
- (1) hasp ($9)
- (1) lock ($9)
Total Cost: $548
PROCESS
Building the Base
- Level out the area where the shed’s footprint will be by moving dirt around if necessary. Check front to back and side to side for level.
- Cut the 4” x 4” pieces to match the width of your shed. These will sit directly on the ground and attach to the frame of the shed in order to keep the rest of the wood above ground contact.
- Build the base of the shed with the pressure treated 2” x 4” and 3” deck screws. Joists should be 16” on center.
- Attach the 4” x 4” skid pieces to the bottom of the base frame with 3” deck screws. I put the skids about 8” in from both sides of the frame.
- Cut the pressure treated 3/4” plywood to cover the top of the base frame, with the plywood flush with the edges of the frame. Use 3” deck screws to attach.
- If there is a structure behind the shed that you want to attach it to, make sure the base is lined up correctly for the shed walls to be flush with the structure. I used string to create a vertical line straight down from our sunroom to the ground so I could position the base.
Framing the Walls and Roof
- Build the back wall first using the 2” x 4” studs and 3” deck screws. The vertical (shorter) studs will need to be mitered to determine the slope of your roof. We used the minimum recommended slope for a shingle roof, 2:12 or 9.46 degrees. Use a miter saw to cut these angles, then cut the vertical studs to length. Attach these to the longer studs, 16” on center.
- Attach the back wall to the base of the frame using 3” deck screws. If there is a vertical surface behind your shed you want to attach the frame to, do that now.
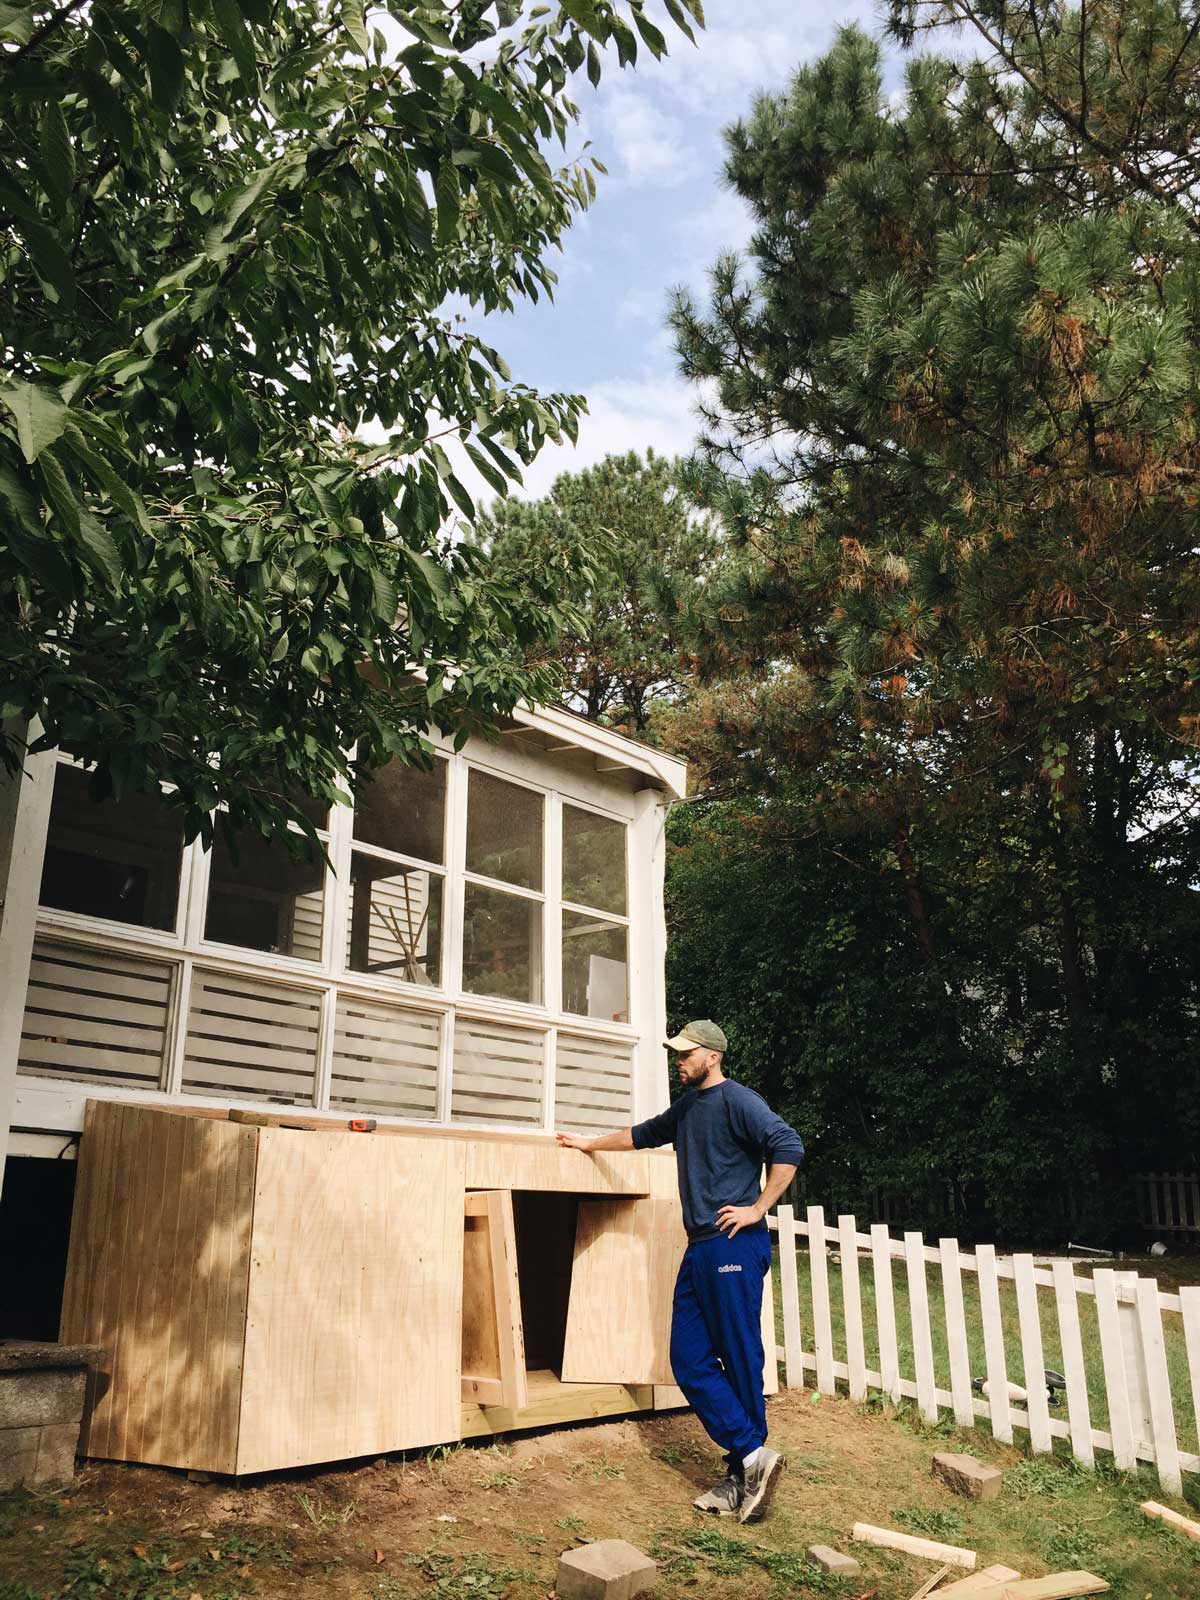
- Build the front wall with 2” x 4” studs, including the last of the longer studs on the top of the wall. To strengthen the doorway, you’ll need to put double thick studs on the sides and top of the opening. Attach the wall to the base of the frame.
- Now build two side walls using the 2” x 4” studs. Studs should be 16” on center, but I just put one stud in the center of the wall because it was close. The side walls will be the same height as the front wall.
- Attach the side walls to the base of the frame, flush with the side of the frame, and to the front and back walls.
- Finish the frame by adding rafters for the roof. These will be made from 2” x 4” studs and attached 16” on center to the front and back walls. You’ll need to use a miter saw to cut the ends of the rafters to be be vertically flush with the front and back of the shed frame. You’ll also need to cut a piece off the front/bottom corner of the rafter so it sits flat on the front wall. You can calculate all this, but I just held a rafter up to the frame and marked where I needed to cut, then replicated that for the rest of the rafters. Attach them to the front and back walls with 3” deck screws.
- For added support you can add a gable stud on each of the side walls in between the rafter and the top of the wall frame.
Building the Doors
- Measure the door opening and subtract 1/2” from each dimension. This will allow for a 1/4” gap between the doors and the opening on all sides. The height of the doors will be the door opening’s height minus 1/2” and each door will be the door opening’s width minus 1/2”, then divided by two.
- Cut T 1-11 siding to match the height and width calculations, then attach a 2” x 4” frame around the outside of the door on the back side of the siding using 1 5/8” exterior screws. The frame should be flush with the edge of the siding.
Covering the Sides and Top of the Shed
- Cut 1/2” OSB plywood to cover the rafters, attaching the pieces with 3” deck screws flush with the sides of the shed and not extending past the vertical plane created by the front/back walls. Add a screw every 6” – 8” around the outside of the roof and every 12” on inside rafters.
- Cut T 1-11 siding to cover the walls of the shed and attach to the studs using 1 5/8” exterior screws. Add a screw every 6” – 8” around the outside of the walls and every 12” on inside studs. The siding should be flush with the bottom of the shed’s base frame and flush with the roof deck surface you made in step 1. If you have help to hold the siding up to the sides, you can mark the slope of the roof and cut the angle with a circular or jig saw. If no helpers are around you can position the siding with clamps and make your mark.
Adding Trim
- Use a table saw to cut 2” wide strips of 1/2” plywood for the trim.
- Attach trim to all edges of the T 1-11 siding using a nail gun and 1 1/4” galvanized brad nails.
- For our door, we cut 1” strips to trim all edges of the doors except for the inside edge of the right door. We wanted the trim to cover the gap in between the doors for waterproofing, so we attached 2” wide trim with a 1” overhang on the right door and 1” trim with a 1” shift to the left on the left door. That way the gap was covered and there was space for the right door’s trim to sit on the left door as it crossed the gap.
Prepping the Roof
- Use tin snips to cut the drip edge to size and attach to the front of the shed by nailing into the OSB roof deck every 6”- 8” with roofing nails. Cut the the drip edge 4” longer than the roof’s width and bend the ends around the corner and attach, using the tin snips to cut a slit to allow for bending.
- Roll out 15 lb felt a few inches longer than the width of the roof (including trim) and cut with a utility knife. Line up the felt flush with one side of the roof trim and the front of the roof and attach with roofing nails every 12” in a grid pattern. You don’t need to attach the top of the felt because it will be nailed down on the next run of felt. Cut the excess felt with a utility knife flush with the other side of the roof’s trim.
- Roll out the next length of felt and overlap the previous length by 4”. Nail down, cut excess felt and continue adding felt until the entire roof deck is covered.
- Cut two pieces of drip edge for the sides of the roof and attach with roofing nails over the felt. Cover the folded section of the front drip edge by tucking it behind the side drip edges.
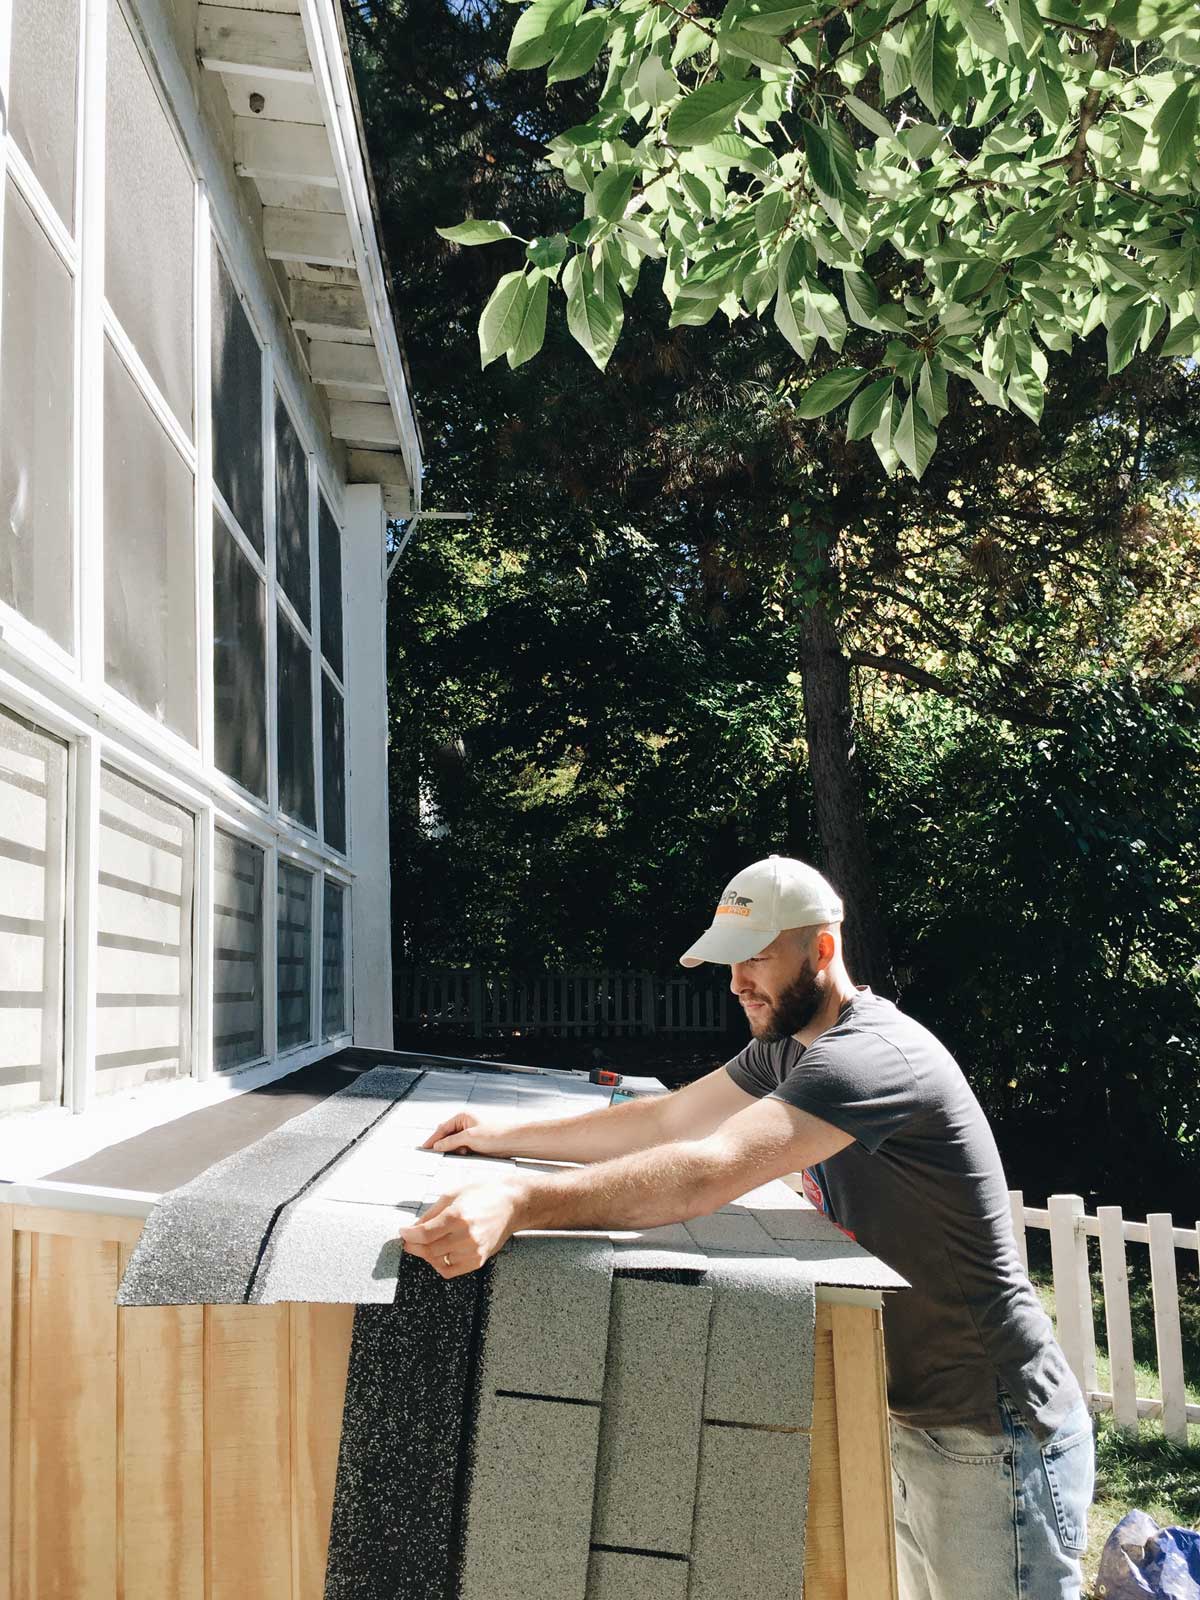
Installing Shingles
- Now the roof is ready for shingles. Under the first row of shingles, you’ll lay a starter strip which you can make from the shingles you have. Turn a group of shingles over and cut just below the tar strip with a utility knife so the shingle tabs are removed and you have a rectangular piece with the tar strip intact. Adding a starter strip helps prevent wind and water damage to the edge of the roof.
- Attach this piece to the roof with the tar strip toward the bottom. The starter strip (and the rest of the shingles on the roof) should overhang the drip edge by 3/8”. Use 4 roofing nails per piece of starter strip, nailing about 1” above the tar strip. One nail near each edge, and 2 nails spaced out in the middle of the strip. Continue cutting and adding pieces of starter strip until the front of the roof is covered. Then use your utility knife to cut the excess off the side to create a 3/8” overhang.
- To start the first row of shingles, first cut 6” off one end of the shingle and align the shingle for a 3/8” overhang on the front and side of the roof. Removing some of the shingle will create an offset so the alternating roof pattern will be easier. Nail down the shingle putting a nail in between the cut outs and the tar strip and at the same level on each end of the shingle.
- The second shingle will butt up to the side of the first shingle. Nail this down in the same way as the first one, making sure you’re creating a straight line with the top of the shingles. The half cut outs at the end of the shingles will make a full cut out when combined – you can use this to confirm the shingles are lining up straight.
- When you get to the other edge of the roof, nail down the last shingle and trim off the edge to create the 3/8” overhang.
- Starting the next row will require you to offset the first shingle in order to create the alternating pattern of the roof. There will be a gap in between the beginning of the second row and the edge of the roof, but you’ll fill that in later after installing the 6th row of shingles.
- Nail down the second row of shingles and leave the excess hanging off the side of the roof for now. You’ll trim the excess from the second through sixth rows all at once later.
- Continue adding more rows of shingles, offsetting the first shingle more and more as you progress through the rows.
- Once you’ve completed 6 rows of shingles, use a straight edge to cut the excess shingles with a utility knife. You’ll use the first row shingle overhang as a reference.
- Now you can use any scraps to fill in the gaps on the other side of the roof. On the first set of 6, you’ll I would guess have to cut some of the full shingles since you won’t have much scrap yet. Nail down the shingles and use the method from step 9 to cut the excess off rows 2 through 6.
- After completing the first 6 rows, you’ll start another group of six and follow the same steps until you finish another 6 rows or get to the end of your roof. Our shed was relatively small so I only had 2 groups.
- When you get to the edge of the roof, you’ll need to trim the last row of shingles to be flush with the edge of the roof.
- You can add flashing to the top edge of the roof to waterproof, but I just ran a wide bead of exterior caulk where the roof met the sunroom wall.
- To smooth the edges of the shingles, use the rough side of a scrap shingle to rub the edges you trimmed and wear down any jagged parts.
Painting
- It’s important to treat the T 1-11 siding with stain or paint or it will quickly get water damaged. First use exterior caulk to fill the seams and screw holes on the exterior of the shed.
- Apply at least 2 coats of paint with a heavy duty paint brush and thick nap roller. We used a porch and floor paint for durability.
Hanging the Doors
- After the paint is dry, put the doors in place and mark the hinge locations. To create the 1/4” gap I wanted, I used the thick ends of some cedar shims to hold up the doors and maintain the spacing on the sides.
- Pre-drill the screw holes on the doors and door frame, then attach the doors to the shed with the hinges.
- Install a locking mechanism to keep the doors closed and secure. We used a hasp and pad lock, pre-drilling holes then attaching the hasp to the trim at the center of the doors.

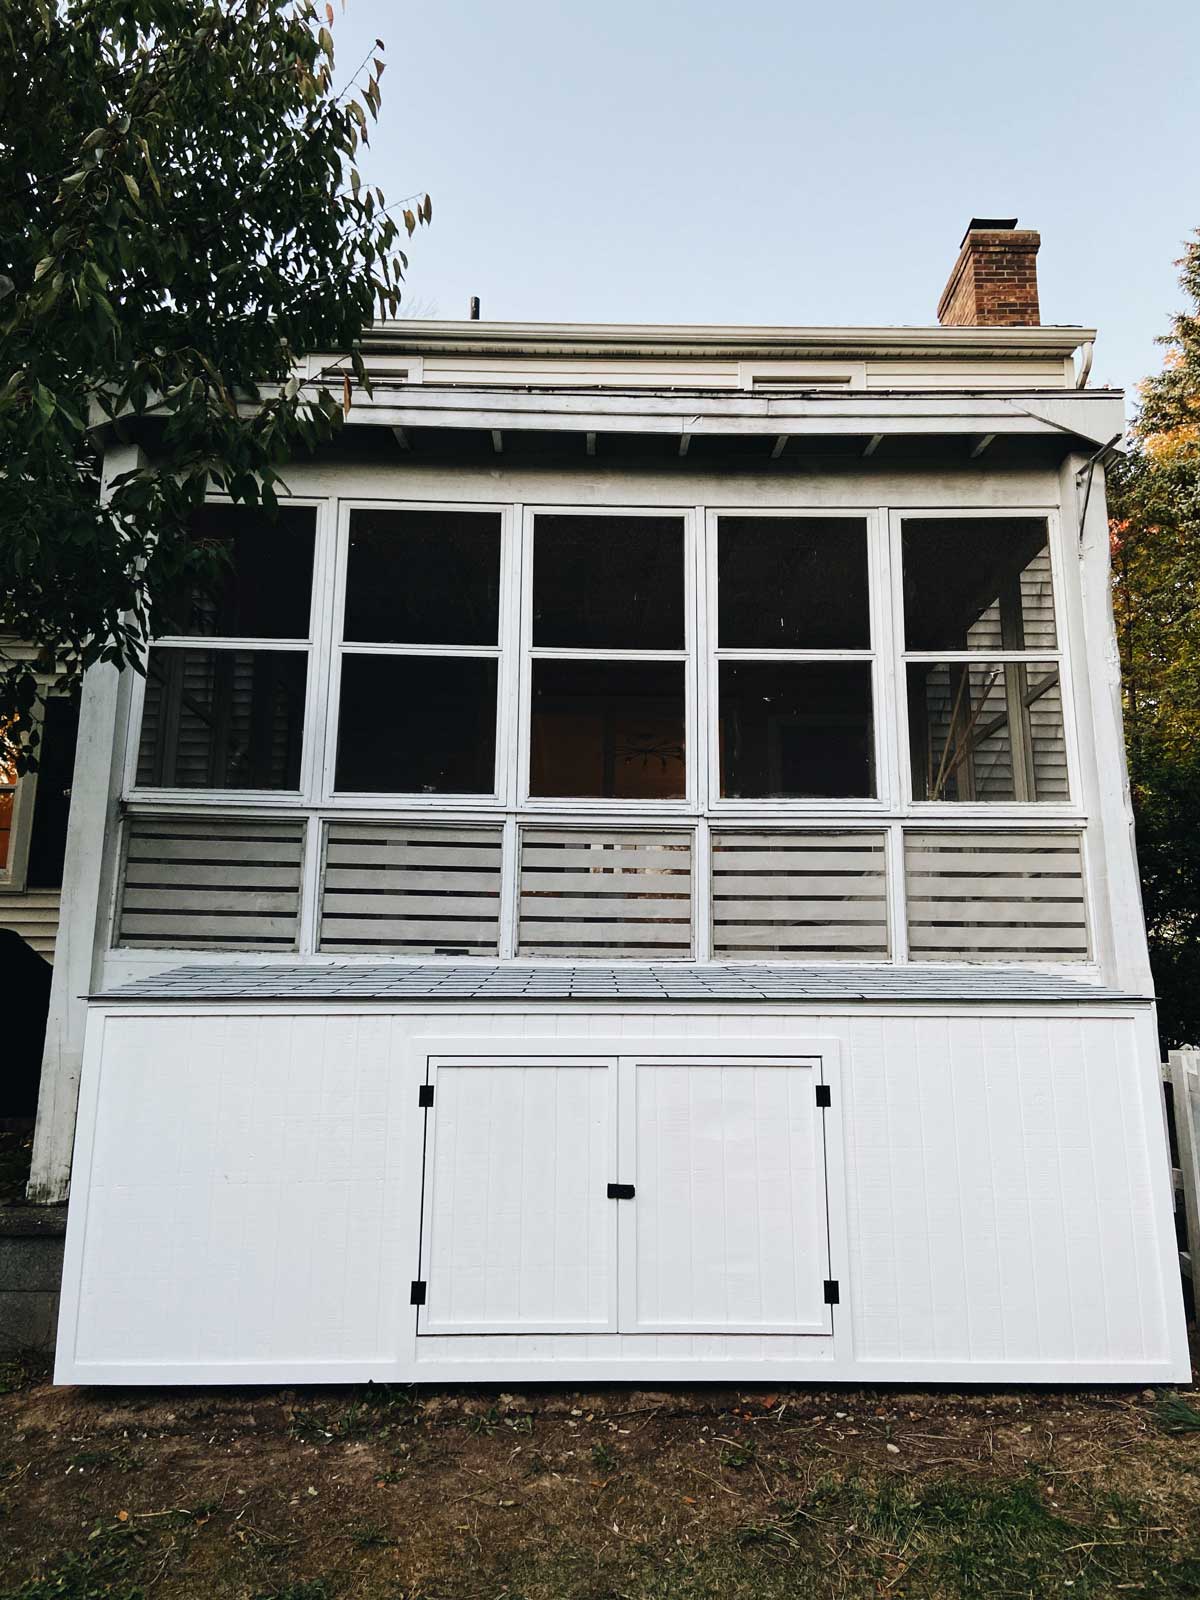
Costing just over $500 and taking a few solid work days to complete as a one-man operation, building our shed felt worth it. Being able to design things that fit in your space both spatially and aesthetically always feels like a win and this project was a prime example.
This was I think my favorite DIY project I’ve ever done. It was surprisingly easy and there’s something about building something with walls and a roof that’s particularly satisfying. Not to mention I’ll have room to walk in the garage now.