Our living room is the land of browns and off-whites. A true confession: I have some color purchase paralysis. If I’m in a store and I have the choice between buying an item in a neutral or a color, I will always pick the white/brown/black. Maybe I’ll chalk this up to frugality? I think I’m figuring if I buy the thing in a neutral, we’ll always be able to use it somewhere and it will have been a versatile, longevous purchase. That’s how we got here, lots of big blocks of neutrals, begging to be broken up with pattern and color.
Now we’ve arrive at our next task – curtains!
David has a powerful annoyance to those plastic blinds that come in almost every apartment in America. I picked up some extension brackets at Home Depot (about $4) that allow us to hang a curtain up to four and a half inches out from the wall, so curtains can go around them. Our landlord is happy because the blinds are untampered. Dave’s happy he never has to deal with them. And I’m happy because stylistically we’re moving in a much better direction.
With some research, I discovered you can paint (yes! paint!) curtains. With regular latex wall paint. Sounds crazy, but I’m up for it.
This project would have been way easier with any large, non-carpet space, but with the nature of our tiny rented home, that did not exist. So I tried to just go for it on the carpet. Huge fail.
Without a hard surface to tape down on and keep everything in place, the fabric and plastic both become wrinkle-city. Defeated and frustrated, I decided this project just wouldn’t work for me. So I tabled it, and we lived with big blank white curtains in our living room, only further perpetuating our neutral-tastic room.
And then! I finally got the idea to tape the curtains to the wall. It felt like a big genius/duh moment. Here’s how we did it all:
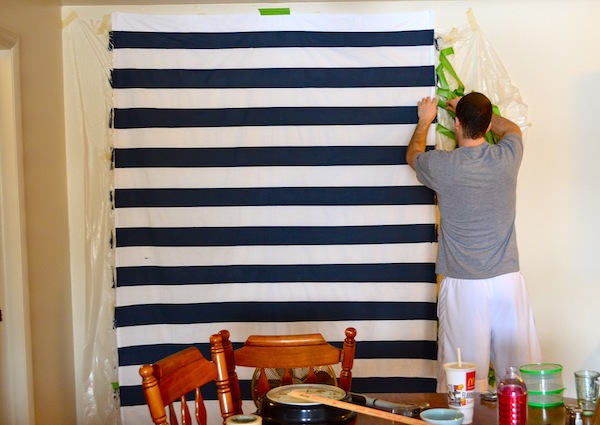
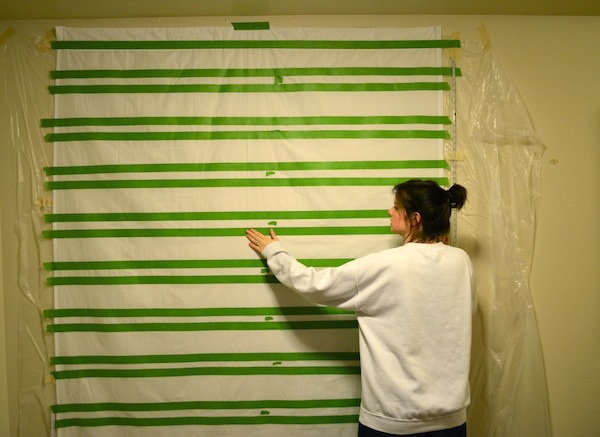
1. Tape a sheet of plastic to a large, blank wall. This is a MUST! The paint will bleed through the fabric.
2. Hang fabric. I used two small nails and for a little extra security – some masking tape. These are plain white twin sheets from wal-mart. (I bought three and cut one in half to keep it symmetrical with two big and two small panels).
3. Tape off stripes (or any pattern). For stripes, tape a measuring tape/yard stick along the side to keep your lines straight. This step will be easier with a friend/husband to help. Also, I recommend frog tape over traditional blue painter’s tape since fabric is a tougher surface to adhere to.
4. Paint! We used Martha Stewart’s Wrought Iron. It’s a great navy blue.
5. Allow to dry for about 2 hours and do a second coat. Remove tape. Let dry overnight.
Here’s the cost breakdown:
Sheets: $15
Paint: $10
Tape: $7
TOTAL: $32
They’re just what I imagined and hoped for. I considered doing a classic, broader stripe, but I’m glad we chose to go narrow (4 inches each). These give the perfect blend of prep with a little bit whimsy. Their high contrast and boldness is just what the room needed.