







Posts by Rachel Schultz

Coffee Filter Butterflies Craft

June 8, 2020

This craft is easier than it maybe first seems and produces really pretty paper butterflies. One thing about doing art with kids that is intended for decoration, (or that you would like to just as a by-product be decoration) is providing them with a color palette. In my ideal, everything in the house is pretty, so I like the kid crafts I make to be genuinely beautiful too. One of the best ways to do that is harness a concept of certain hues that will all look good together.

I really liked coffee filters as an art material so this has prompted an immediate desire to brainstorm other ways to use them for crafts. Kind of like a possible less expensive tissue paper? Would have to price check but I think it is. Especially how with the below method you can make  any color you’d like readily!

And this is a great celebration of summer crafting because one step is easiest when you have some nice bright sunshine for your papers to dry in! And a real butterfly may float by while you’re making them.

MATERIALS

  1. two coffee filters
  2. tape
  3. markers
  4. spray water bottle
  5. scrap of cardboard
  6. pipe cleaner

INSTRUCTIONS

  1. Tape coffee filters to a table. (You may want a bleed sheet underneath). Color on coffee filters with regular kid markers. Shapes, a design – anything works.
  2. Place colored coffee filters onto a scrap of cardboard (perhaps outside) and spray with water until all of coffee filter is wet.
  3. Place coffee filters in sun to dry.
  4. Fold coffee filters like an accordion (separately).
  5. Twist pipe cleaner around center of accordions to connect them. Fan out paper. Adjust pipe cleaner to look like antennae.

In my experience, kids thought these were really exciting and special and the way they came together at the end was fun reveal.

You may also like this painted binoculars craft, how to actually do some art with children, and favorite kid art supplies that make it easy.

This craft is easier than it maybe first seems and produces really pretty paper butterflies. One thing about doing art with kids that is intended for decoration, (or that you would like to just as a by-product be decoration) is providing them with a color palette. In my ideal, everything in the house is pretty,

READ MORE

RAINBOW CRAFT FOR YOUNG CHILDREN

April 6, 2020

Our family just loves rainbows, year round. But I like when rainbows get a little extra highlight around easter and in spring too. It is perfect for spring rain storms and how easter includes remembering God’s promises. This craft is a good one for a range of children’s ages, including very young. I found it fun and soothing even as an adult – concentric circles, orderly proceeding colors. The satisfaction of the final cut at the end to make the two rainbows! We did the standard rainbow shades but other versions – like maybe a pastels one – would be so pretty!

Also it’s a great introductory craft for young children getting to start practicing with scissors.

MATERIALS

  1. Colorful paper
  2. Scissors
  3. Glue
  4. Pencil
  5. Seven bowls of different sizes

INSTRUCTIONS

  1. Trace around largest bowl on first color paper (perhaps red). Cut out with scissors.
  2. Repeat with remaining colors. We did seven for red, orange, yellow, green, blue, indigo, and violet.
  3. Glue papers together, centered on each other.
  4. Cut circles in half to produce two rainbows!

These are decorating our house for spring, but I just love a good little rainbow. So I may keep one tucked in a children’s bedroom or the playroom year round.

You may also like this painted binoculars craft, how to actually do some art with children, and favorite kid art supplies that make it easy.

Our family just loves rainbows, year round. But I like when rainbows get a little extra highlight around easter and in spring too. It is perfect for spring rain storms and how easter includes remembering God’s promises. This craft is a good one for a range of children’s ages, including very young.

READ MORE

DIY Hanging Wallpaper (The Permanent Kind!)

December 2, 2019

One of the most helpful exercises for people who are trying to design their own home is to of course gather inspiration (pinterest and instagram are the faves for this) but ALSO study the photos you are drawn to and figure out why exactly you were drawn to it. So I have a million pins on my boards, but when I started reviewing them and observing common themes is when I have began refining my taste and identifying enduring design favorites.

I can’t turn down a space with a great WALLPAPER. Once I learned this I noticed myself immediately pin-ing an image, and then when I studied the photo to see why I reacted so strongly to it, I would sometimes see that there really wasn’t anything I specifically liked in the photo except a great patterned wallpaper. And then I am drawn to the whole thing!

Sounds like a pretty powerful design element and quite worth doing! I just love wallpapers in rooms. I wanted to add some wallpaper to our master bedroom!

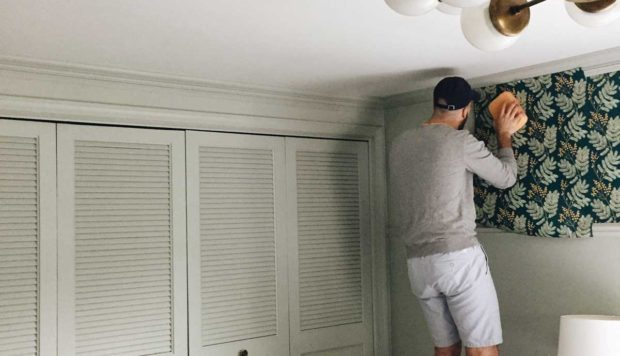
I was looking for a sculptural pattern in blue green tones. This mimosa print immediately stood out to me and tested samples of “tranquil crop,” “wattle green,” and “red tango.” I was so torn because they were all really good blue based options. After much ado, I made my choice and Milton & King sent me three rolls of the “wattle green.”

We were deciding between doing peel-n-stick or permanent paper. David said he preferred learning to install the permanent kind so we went with it! It was not hard! (At least with this kind!) Here’s exactly how to do it.

MATERIALS

  1. wallpaper adhesive ($13)
  2. foam roller ($9)
  3. foam brush ($2)
  4. snap off utility knife ($12)
  5. knife blades ($8)
  6. drywall knife ($12)
  7. sponge ($3)
  8. seam roller ($5)

PROCESS

  1. Prep the walls by scraping with a drywall knife and patching any holes. After that clean with a damp soapy rag. 
  2. Choose your starting place. It’s recommended to start at a prominent light source (like a window) and work away from that point toward a corner with low visibility (like near an entry door). The seam where you finish papering should be the only place where the wallpaper’s pattern does not line up. 
  3. Measure your wallpaper’s width and subtract 1/2”. Make a pencil mark that distance away from your starting point and create a plumb line using a level or plumb bob. When you install your first piece of wallpaper, you’ll line one edge up with the plumb line and overlap the extra 1/2” on the other side around the corner where you started. Since not all walls or window frames are square, this allows you to start your papering using the plumb line you drew with the pencil instead of relying on the starting corner for straightness. 
  4. Using the width of the wallpaper, measure from the plumb line and make another pencil mark. Continue doing this until you’ve marked the entire room. These marks show you where your seams will be. If any seams will be too close to an obstacle, you can adjust your starting point to change any unwanted seam locations. 
  5. When you’re ready to attach your starting piece, cut a length from the wallpaper roll that’s 4” longer than the space you’ll be covering on the wall. This allows 2” of paper on the top and bottom that can be trimmed. 
  6. Spread an even layer of wallpaper adhesive on the section of the wall you’ll be papering. Use a foam brush to cut in around obstacles and cover the rest with a roller. Be sure to put adhesive about 1” past the the point on the wall where the edge of the paper will be so the seams will stick well to the wall. 
  7. Line up the edge of the paper with the plumb line and gently press the paper on the wall. As you do this, smooth out bubbles with the sponge, working from top to bottom and middle to outside. If something goes wrong and you have to take the paper off the wall, that’s ok – you can spread some more adhesive on the wall if needed and reapply the paper. 
  8. At locations where the paper comes in contact with a corner or the top or bottom of the wall, you’ll need to cut the excess with a utility knife. While being careful not to rip the paper, hold a drywall knife into the corner where you’ll be cutting to create a straight edge. Change your knife blade often so a dull blade doesn’t rip the wallpaper. I changed mine almost every time I made a cut. When the wallpaper needs to go around a corner like on a door frame, you can make a relief cut with scissors at the corner to allow the paper to fold in the right direction to move into position.
  9. After you’ve completed smoothing your first piece on the wall, you can cut another piece, apply adhesive to the wall, and line up the new piece with the edge of the paper that’s already on the wall. Smooth the new piece using the sponge and trim off excess paper. 
  10. Use the seam roller to set the edges of both pieces in place by rolling firmly over the seam. 
  11. Repeat the process of cutting paper, applying adhesive, and smoothing the paper onto the wall until you’ve come to the corner where the pattern will be misaligned. Then return to your starting point and use the exposed edge of the first piece of wallpaper to start going the opposite direction in the room until you reach the final corner. Be sure to always use the full width of the wallpaper sheets until the very last corner so your pattern will only misalign in one place. 

After this project – my verdict: I LOVE WALLPAPER EVEN MORE. I can’t wait to install some more. The experience putting it up was easier than we expected and its effect on the overall room is so strong. I love color but I like, love love pattern and the way mixing patterns feels in a room.

Closing comment – do wallpaper!

One of the most helpful exercises for people who are trying to design their own home is to of course gather inspiration (pinterest and instagram are the faves for this) but ALSO study the photos you are drawn to and figure out why exactly you were drawn to it. 

READ MORE

Copyright © Rachel Schultz 2026

PRIVACY POLICY