Finding a chair at the perfect height, that was COMFORTABLE was very hard, so we built our own. What makes this stool great is that it is extra wide and has a nice back for support, while still sliding completely under our standing desk. Which all makes for a productive, happy work place. Our computer sat in our master bedroom (gross) until we found the perfect chair to make it functional in the office. Even when we become standing desk pros, everybody needs a seat sometimes. (And for me I was pregnant, so I needed a chair MOST OF THE TIME.)
I wondered if adjustable was going to have to happen because spouses eight inches apart in height have different chair lifestyles. With some searching I found some affordable other options – these and these. (I always use the google shopping search to make sure the place I first find my item is the best price anywhere.) Those chairs turned out to be not tall enough. Also I wanted a hefty foot rest to prevent that horrible discomfort from your legs just sadly dangling there.
I could never host one of those daytime talk shows where they sit on high stools. The leg circulation! How do they do it!
So okay, let’s build it. We adapted our plans from this design. We bumped the seat width out to an indulgent 24 inches. (I like being able to sit cross legged.) And lowered the back (so it could go under the desk). The materials were about $50 and it took about two days for us to build.
Now the build plans (!), via David!
TOOLS
- Miter saw
- Jig saw
- Table saw
- Level
- Tape measure
- Speed square
- Safety glasses
- Drill
- Countersink drill bit
- Sander
- Clamps
MATERIALS
- Wood glue
- Spackle
- Putty knife
- 2 and 1/2 inch screws
- Right angle brackets
- (1) 2′ x 2′ piece of 3/4″ plywood
- (3) 2″ x 2″ at 8′ long
- (1) 1″ x 6″ at 2′ long
- (1) 2″ x 3″ at 8′ long
Note: Pre-drill all holes, countersink all screws, and use wood glue at all the joints. Use the speed square and level to make sure all the pieces are square and level as you go. It will be a lot easier to adjust a screw or two in the process than to find out things are out of whack at the end. Use clamps as needed to keep things in place and square as you attach the pieces.
PROCESS
1: Cut Your Pieces
Miter Saw Cuts:
(2) “a” pieces – 39” 2” x 2”
(1) “b” piece – 20 3/8” 1” x 6”
(2) “c” pieces – 20 3/8” 2” x 3”
(2) “d” pieces – 20 3/8” 2” x 2”
(2) “e” pieces – 31 3/8” 2” x 2”
(2) “f” pieces – 12 15/16” 2” x 2”
(2) “g” pieces – 12 15/16” 2” x 2”
(2) “h” pieces – 51” 2” x 2” (These pieces will need an approximate 45 degree miter cut in a later step, but I prefer to wait until I’m ready to attach the piece to make sure the angle is right. The piece will end up being about 50” from long point to long point, but I’ve left a little room for error in the length.)
Table Saw Cut:
(1) “i” piece – 23 7/8” x 18 9/16” 3/4” plywood
Jigsaw Cut:
Cut the corners of the “i” piece
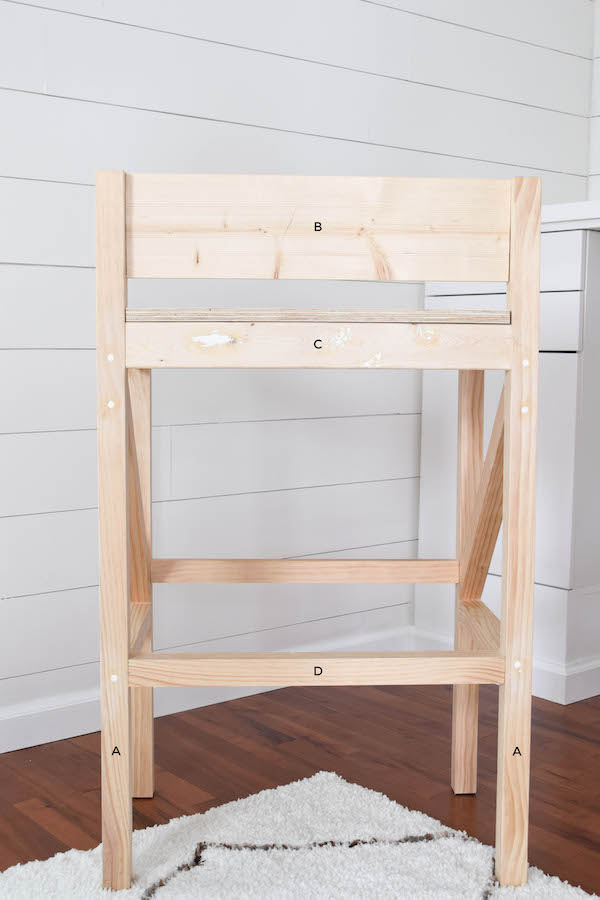
2: Assemble Back of Chair
Connect (2) “a” pieces, (1) “b” piece, (1) “c” piece, and (1) “d” piece. Piece “b” should be flush with the edges of the “a” pieces that will be toward the front of the chair and piece “c” should be flush with the edges of the “a” pieces that will be toward the back of the chair.
Put the screws for the “a” to “c” connections near the top of the “c” pieces. Don’t center the screws, as you will need to put another screw in later at that same area.
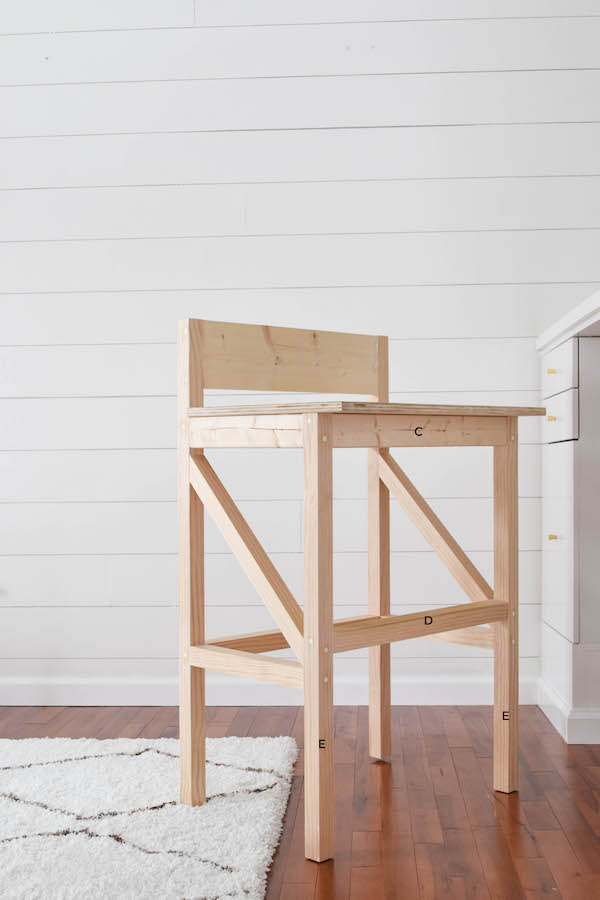
3: Assemble Front of Chair
Connect (2) “e” pieces, (1) “c” piece, and (1) “d” piece. Piece “c” should be flush with the edges of the “e” Pieces that will be toward the front of the chair.
Put the screws for the “c” to “e” connections near the top of the “c” pieces. Don’t center the screws, as you will need to put another screw in later at that same area.
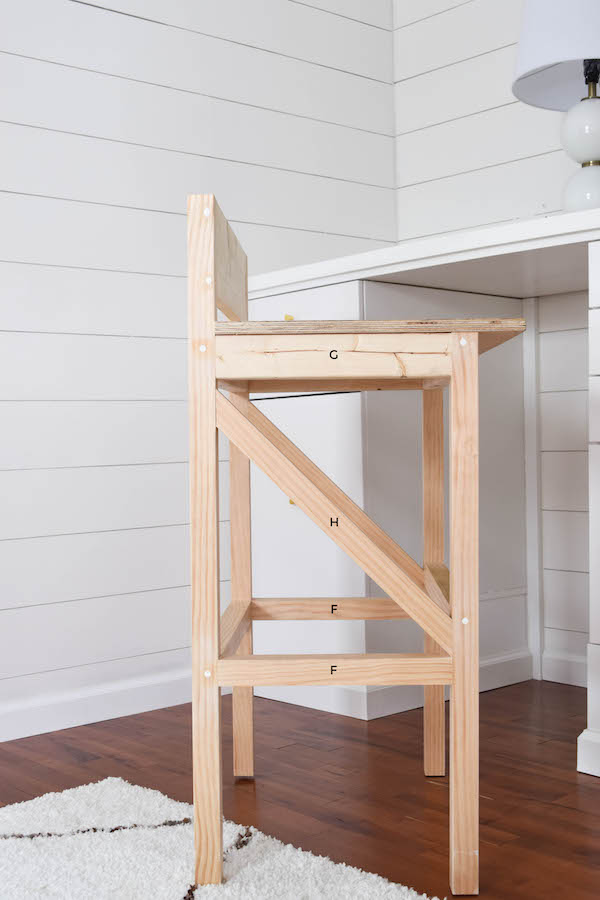
4: Attach Front and Back of Chair
Attach the front and back assemblies using (2) “f” pieces, (2) “g” pieces, and (2) “h” pieces. I found clamping to be the most effective way to keep everything in place while getting ready to screw the front and back pieces together.
The “g” pieces should be flush with the edges of the “a” and “e” pieces that will be toward the outside of the chair. Put the screws for the “a” to “g” to “e” connections near the bottom of the “g” pieces so you don’t hit the other screws.
The “h” pieces will need an approximate 45 degree miter cut, but if some of the measurements are off on your chair at this point, you can adjust the angle slightly. I cut one end of the “h” piece at 45 degrees then sized it up on the chair to see what length and angle I needed for the other side of the piece. Make sure the ends of the piece are parallel!
5: Attach the Seat
Attach piece “i” to the “g” pieces by screwing down through piece “i.” We put screws about every 8” along the front and sides of the seat. We painted our chair, so we didn’t mind the screw holes, but if you are trying to minimize those, you can use right angle brackets to attach piece “i” to the “g” pieces underneath the seat.
6: Finishing Touches
Sand all surfaces with a power sander. We rounded off all the corners as well to make the seat more comfortable. Fill all holes with putty and sand smooth. Now you’re ready for painting, drying, and sitting!
THERE YOU HAVE IT. After some ado about paint color (navy? emerald? yellow? olive? natural wood?), I chose white. I wanted a masculine color because this room is leaning girly. HOWEVER, we decided white would be best because the chair is nice and we like it but it’s not like a WORK OF ART, showcase it with a color. It blending in with the same color of the desk will look better, David pointed out.
I will I think do a stool on each side, the same as each other but different than this center one. They can be less expensive and less comfortable (backless?) because they don’t have to be the main work chair. Perhaps a little more fashion over function.
Now I’m going to begin adding more layers to this room and I’m already getting really into it. My free time has been getting all our art in frames and/or getting something into our empty frames that is a piece I LOVE and not just filler art. I know you know what I mean.